Sometimes I get a strong urge to be crafty and thrifty. One time I decided to strip a dresser that had two layers of ugly paint jobs and re-finish it. I managed to work for a couple hours and realized it would take more like a couple weeks to finish the project. I gave up quickly.
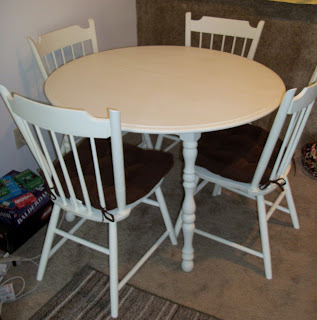
Well, a month ago I was just starting my spring break, and I decided I needed to be productive. We had a small round dining table that was $18 from a consignment store and a set of four chairs that did not match the table. This was fine for our small college apartment, but since we are moving into our very own house I wanted something more elegant. I decided to paint the whole dining set to match and to look like what a homeowner would have instead of what a college student would have. As of today I finished the last two coats of pain on the last chair, and I decided to post the results with a step-by-step tutorial by the-farthest-thing-from-a-DIY-expert.
Here is the before picture. The dark finish table and the light finish chair.
What I used:
-Several different grades of sand paper (about $10)
-A gallon of Kilz original primer ($20)
-A gallon of satin finish wall and trim paint ($20)
-About 15 cheap small sponge brushes from Wal-Mart ($3)
-4 seat cushions from Wal-Mart ($20)
I started with 60 grain sand paper on the table and sanded the top until the finish came off. Then I used 100 grain sand paper to smooth it out. I unscrewed the base from the top and primed the top with two coats and sanded with 150 grain sand paper after each coat.
Then I put the top aside for later. I sanded down each half of the base. I had to glue a crack in one of halves and let it dry over night. I put two coats of primer on each half of the base and put two coats of paint on with sanding (150 grain) in between each coat of primer and paint. After the base was done I screwed it all back together. After it was screwed back together I put five coats of pain on while lightly sanding in between each with 150 grain and 200 grain sand paper. The table is done!
At that point I repeated the process with the chairs. I sanded the finish off, which was much more difficult/awkward with spindle chairs. I used two coats of primer and two coats of paint while sanding drips and blemishes in between in coat. One of the chair spindles had broken, so I also glued that back together and let sit over night. Here is the finished product with only two of the chairs. But all four chairs are done now!!
 |
| My Dining Set |
The chairs took the most time and were the trickiest. I hope the pain holds up long term. I eventually will put another coat of paint on the table top and then put a sealant over it to keep it glossy and stain free.It was an extremely time consuming project, but I'm so happy with my result. Tips to anyone considering trying this- don't expect each step to be done in a day. Wait until a time in your life that you have some extra time and do it the right way. :)


Good job btw! It looks great! When you did the 5 coats of paint did you let it dry in between before u sanded it? Thanks for sharing!!!
ReplyDeleteKaila
Thank you! I did let everything completely dry before sanding. I also wiped it down before another coat. I would recommend using a clear top coat to seal it, which I have not yet done.
ReplyDeleteGreat job! I love that table, the legs are so cool! Thanks so much for sharing this Emily! :)
ReplyDelete